Monday 23 December 2013

Peg Dolly Angels


A chorus of Angels have been created this Christmas, although I have only photographed one.
Pattern courtesy of Better Homes and Gardens magazine.


Felt, dolly peg and pipe cleaners are the main ingredients, with embroidery thread to hold the felt together/ embellish the wings and then some glue to hold the wings, halo and dress in place.


Pop the finished dress over the peg to dress the angel and thread the pipe cleaner through the sleeves to make the arms and then twist the extra lengths of pipe cleaner up behind the head to create the halo. Add a pen drawn face and some slippers to finish.


Saturday 21 December 2013

A simple dress or top

I’m still a bit wimpy when it comes to attempting sewing clothing, so I kind of forced myself to give this a go. Perhaps then it would have been wiser to start with a project where I had a pattern, but no – I decided to do what all the kids clothing super-sewer-bloggers tell you to do – “just work out a rough pattern from another piece of clothing that fits your child”. Easier said than done. Or maybe my mistake was trying to make the top a size bigger because it ended up maybe 2 sizes bigger!

Overall though, it has worked, and maybe I will have the confidence now to try something a bit more complicated….in the New Year. And either way, Little Imp is pretty happy with this version (and the benefit of my errors is that it will fit her next year too!)


This is what I did.

Worked out a pattern back and front as shown. The dotted line indicates where I cut the lining to.

Cut one front and one back from the main print fabric.
Cut one front and one back from the lining fabric (up to the dotted line shown on the paper pattern)
Cut 2 straps (11”x 2”) each out of main print and lining fabrics.

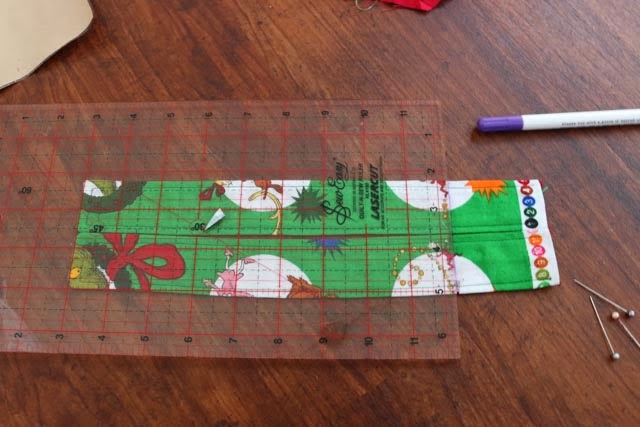
When cutting out the patterns I used my quilting ruler and rotary cutter to cut all the long straight edges – super easy and faster than scissors.
all the cut pieces of fabric - red for lining & Grinch print for the outer

 Straps: 

For each strap place lining and main fabric right sides together & pin. Sew straight stitch around 3 edges, leaving one short end open (I used a ¼” quilting foot to keep seams super neat).

 Clip corners as shown & then turn right side out through the open end. Poke corners through if needed to make them nice & neat and then take time and iron straps flat, working fabric with your fingers if needed as you iron to get nice neat edges.

Straight stitch around the same 3 edges with a ¼” seam to finish strap.

Lining:

Fold over the bottom raw edge twice, iron and straight stitch using matching thread to finish the bottom of both front and back lining pieces to prevent fraying.

Next, lay front and back lining pieces right sides together and pin down side seams, matching up top corner. Straight stitch together down each side seam with matching thread, starting from the top to make sure that this join is neat and matching.  My machine has a straight stitch that also finishes the edge at the same time - if yours doesn’t then also zigzag the raw edges after straight stitching.


 Outer:

Lay front and back pieces of main print fabric right sides together, pin and then sew side seams using matching thread as you did for the lining.

lining and main sections sewn and finished down both side seams

 Assembly: 

Turn lining right side out. Iron side seams flat, one facing toward the front and one facing toward the back.
 Iron side seams in outer layer flat too – but have these facing opposite directions to the lining seams. This will make it easier to achieve a neat join under the arms.

Slip the lining into the outer main fabric, so that right sides end up facing each other.

Match up & pin raw edges of lining & outer along top of dress, ensuring that the side seam joins match up. If you have ironed the seams facing in opposite directions they should lie nice and flat at the join of the side seams as shown in the photo.

Then stitch the main fabric to the lining around the front of the dress.
Turn the dress right side out and pin the straps in place at the front of the dress. Then, if you can, get your model (an unwilling model in this instance!) to try on the dress so that you can work out how long the straps should be. Mark this and then remove, leaving your model in peace! Turn dress inside out again.

 This picture shows the roughly marked line on the right hand side.

Remove both straps and, using a quilting ruler if you have one, or any ruler if you don't, mark  even, straight lines on both straps.
Then slip the straps in between the lining and the outer fabric, lining up with the strap marks you made before to get the right length, and position so they will line up evenly over the shoulders. Also make sure that the main print side of the strap is facing upwards.

 Pin in place, and then stitch across the back to join main fabric to lining, catching the straps as you go. I didn't trim the straps down as this way I could potentially extend them in time if Little Imp grows!

Then open out the dress, so that you see the right side of the main fabric & the lining. The lining will be on one side & the main fabric to the other. Now you need to understitch the lining to help stop it rolling over to the outside where it can be seen. Slip the lining under the presser foot with the seam allowances facing the lining. Stitch through all these layers (lining and all seam allowance layers) about 2mm from the seam as shown.
When you fold the lining back into the dress you will have a nice neat edge (a bit hard to see the understitching in this picture as I used matching red thread). Iron to get really crisp edges.

You can also top stitch all the way around the top of the dress. Use thread that coordinates with main fabric & then stitch all the way around about 1/4 inch from the edge on the right side of the fabric, catching the lining as you go.  This just finishes the edges nicely.

Hemming

Iron hem over twice (about 1cm for each fold) to enclose the raw edges.

And then straight stitch to secure. I used my 1/4 inch foot to help stop wobbly stitching!

Finishing
Sew buttons (or pom poms) onto the front edge of the straps as shown. These are purely for decoration.

On one of the straps add a press and a matching stud in the corresponding spot on the dress itself. Finally, stitch the other strap down securely. I find that you only really need one strap able to be opened to get the dress on & off.

Hopefully your model will be a bit more willing to wear it now there are no pins in sight!

Friday 20 December 2013

Feeling Christmassy!

Someone is a bit excited about Christmas this year...


and so am I! Any excuse to be extra crafty & creative:) A Christmas Grinch dress/top for Little Imp that received the seal of approval.

Of course a Christmas hair clip is also required to finish the look. Same technique I've used before to make a felt hair clip. Simply cover a clip with felt sewn together with blanket stitch & then glue on something Christmassy - a wooden tree decoration in this case.
                               

Some Christmas 'stocking' drawstring bags. I had thought I would make proper stocking shaped stockings, but where would I hang them and what if the presents were too big to fit in the small opening? A drawstring bag seemed far better & this pattern for a lined drawstring bag by In Colour Order was fantastic. I just adapted the sizes a bit to suit what I wanted.


I think we are almost ready for Christmas day!

Just now it is time for another fruit mince pie though!
Instructions for the dress are here.

Tuesday 17 December 2013

Some more elephant softies


I made a felt elephant recently for Little Imp's cousin....  


...and then, perhaps against my better judgement (given the excessive number of soft toys Little Imp already has) I agreed to make her one for Christmas too.  Given she is a bit older now I thought a cotton print fabric for the body would be more fun. And I think I was right! 


Given how much I liked how that one had tuned out I figured I may as well make her other cousin one too.

So now I have 3 elephants waiting to meet their owners.


I have made elephants for friends before from this Woman's Weekly pattern, but this time I also worked out a great way to add a 'jingle'. I've found in the past that when I insert the little metal bells into softies that the bell becomes far too muffled by all of the fibre fill. My solution in this instance was to do away with the bell altogether & instead I put some beads into a small plastic canister about 4cm high x 2cm diameter. The elephant is fat enough that I could stuff the canister into the middle of it's body still not really don't notice it among all the stuffing. Super Jingly too!


A link to some other elephant softies I've made in the past

Friday 13 December 2013

Kura bed - an ikea hack

An Ikea Kura bunk bed and an' Ikea Hack' of sorts.

I finished this AGES ago, but haven't got around to taking photos until now. Perhaps that is in part to the fact Little Imp's bedroom is not often quite this tidy!

There are lots of different ways of using the Kura bunk bed, but I haven't seen one that simply leaves out step to leave accessible storage space underneath.


We (the 'Royal We' that is - Little Imp's dad!) made up the bed as instructed other than inserting one of the panels (the longest one opposite the ladder) that in theory would stop your child falling out of bed when it is used as a bunk bed. This leaves a great sized area under the bed for storage - including the panel we haven't inserted into the bed.

I guess you could use a valance to hide the opening to the storage space. In this instance though, a well positioned armchair and some sheer, embellished curtains that I have made and hung part way around the bed work for us (these pics show the curtain slightly pulled back to reveal the storage space) that is normally pretty well hidden.


Of course this project lent itself to lots of fun - a place to stick all the butterfly wall decals we hadn't used yet and time spent making up coordinating bunting and little curtains to embellish the new bed. Fun creative times indeed!

To make the curtains
Stitch together fabric patterned scraps, embellish however you like and then sew onto solid coloured fabric.

Cut out sheer curtain fabric to the length you want plus a few inches extra. Fold over the top and stitch to create a tube for hanging the curtain. Hem the bottom.
Then gather lengths of ribbon, fold an inch over at the top and pin in place along the top edge of the curtain. Cut out some butterfly shapes from coloured netting and arrange to please along with the fabric pieces you made up before. Pin all in place.


Stitch each of the ribbons in place along the top of the curtain.
Stitch  a reinforced line through the middle of the net butterflies and around each of the fabric pieces.


Hang the curtains and some lovely bunting....bed time for little ones!


ps. if you like the armchair in the pictures here's the link to my armchair recovering post

Tuesday 10 December 2013

Another crinkly tag toy....and an elephant!

OneLittleImp has a new cousin! So what have I made for her for Christmas?

A few little things...


First up the tag toy. I think this is the best version I have made, this time in flannel. My felt version was probably a little simpler, but this one does look neater and a bit more 'finished'.  The elephant is an old pattern from a Woman's Weekly, made mostly of felt, and a little bit of left over flannel for the ears.

Tag Toy
Basic Tutorial:
  • cut 2x approx 7 inch squares of a flannel fabric
  • cut 2x 6.75 inch squares of batting
  • cut a 6.5 inch cello square
  • cut ribbon of various lengths (between 4 - 12inches)

Fold over approx 1/2 inch along all four edges and iron to crease once square of flannel fabric. I spent a few moments hand stitching each of the four corners so they looked nice and neat. Trim the excess fabric at the corners before you do this if you need. 


Tuck one piece of the  batting the 'frame' that you have now created. Then repeat all of these steps for the second piece of flannel and batting.

 Place both squares together, batting on the inside and iron on a warm (not hot) setting to flatten and ensure their edges match pretty closely.


 Take apart and place the piece of cello on one of the squares.

Close back up to form a sandwich - flannel, batting, cello, batting, flannel - and pin temporarily to hold edges neatly together with a few extra pins in the centre to keep the cello in place. Then start to insert the pieces of ribbon.

Fold most of the ribbon pieces in half and then slip in between each half of the flannel/batting sandwich, with a good inch or so within the sandwich and pin in place. This will ensure the ribbon is well picked up by your finishing edge stitches and less likely to unravel in time. I also doubled over the thinner (teal) ribbon in a few spots for a bit more interest.  Make sure your corners and edges are still aligned before the next step.

  • Using a straight stitch, machine stitch the fabric squares together about 1/4inch from the edge,  removing pins as you go & ensuring you catch all the ribbons. Then stitch another line all the way around, close to the first.

Finally stitch a square in the middle (to help hold the cello in place) and you are done!