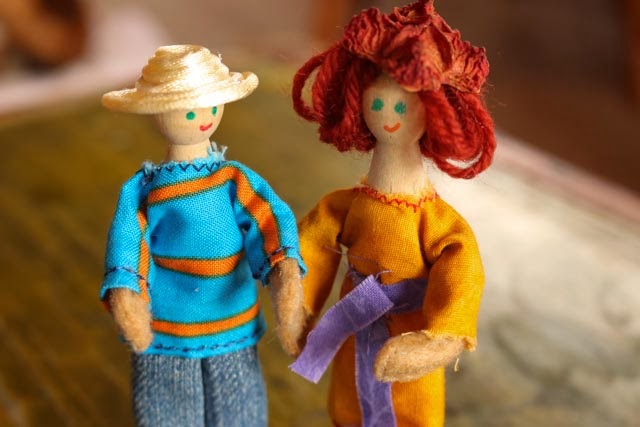
The initial inspiration for these clothes pin dolls came
from a Better Homes and Garden magazine with clothes pin dolly angels, elves
and skating girls. I based the skirt and tops on the patterns in the magazine,
modified somewhat to create these dollies instead.

What you need
- Wooden old style clothes pegs or 'clothes pins'
- Bits of felt, fabric, ribbon, wool
- Pipe cleaners (chenille sticks)
- Drill with 2/2.5mm drill bit
- Fabric glue
- Pens
- Paper/card if you want to make clothes patterns
- Scissors / pinking shears
- Imagination
All of these dolls have flexible, moveable pipe cleaner arms
that are attached through the peg itself. Use the drill to make a small hole
all the way through the peg at ‘shoulder’ level. Insert pipe cleaner cut to about
8cm (not yet cut in picture below).
 |
| middle - clothes pin with hole drilled at 'shoulder', right - insert pipe cleaner 'arms' |
Embroidered Denim Skirt
Mark and cut out skirt. Using pinking shears for the bottom
of the skirt will mean you don’t need to worry about hemming.


Embroider whatever takes your fancy – a few daisy stitch flowers and some running stitch perhaps.

Fold skirt in half, right sides together and either hand or machine stitch a seam down the matching straight edge.

Turn right side out and press seam flat.

Pinch the ‘legs’ of the dolly together to pull the skirt up and onto the doll if you have already inserted the pipe cleaner arms, (I hadn’t in this picture so just pulled it over the head if not). Use a little bit of glue to secure skirt in place once you have it in the right position.

Denim Jeans
This method uses an old pair of jeans, cut so that the
original hem is still intact. Each ‘leg’ of the jeans is made separately.
The focal point in these pictures is terrible – sorry!
Cut out 2 rectangles approx. 6cm x 5cm, ideally including
the original hem line of the jeans as you can see in this picture.

For each rectangle - Turn over approx. 1 cm at the opposite end to the original hem line and straight stitch (black stitch in photo).

Then fold in half to match up other raw edges and straight stitch again.

Turn right side out & you should have a fabric tube that will become one leg of the jeans.
Slip each ‘leg’ of the jeans on over a separate peg ‘leg’, with the original jean’s hem line at the bottom as shown. You may need to gently prise the peg open a little to get all the fabric to fit but the fact it is snug will help hold the jean in place. Use glue at the ‘waist’ to secure the top of the jeans once you have pulled them up as far as they can go.

Once you pull the top on you won’t notice that the jean legs were made up separately.

Top or dress

One step that is worth doing before you go any further is to cut a small hole for the head to fit through and reinforcing this with a tight zig zag or blanket stitch. I did this on the blue and orange top first up and this made it much easier/neater than leaving it until after stitching the side seams.
Freestyle from here on in though - you can fold over and make a proper seamed sleevse and bottom of the top before turning inside out and stitching the sleeve and side seams...

...or... cut sleeve and bottom edges using pinking shears and don't bother folding over and stitching. You can also machine stitch side seams (above), or hand stitch (below).

Once all the seams are finished, turn inside out (add a neck hole if you didn't earlier)...

And then 'dress' your doll. Much easier if you do this with the 'arms' pointed upwards.

Add a tie on or stitched on belt if you like.


Felt plaited hair
Cut out a piece of felt as shown – the middle part is
slightly smaller than an Australian 5 cent piece, and each ‘strand’ is
about 6mm wide and 60mm long. Cut a
notch as shown.

Working from each side, plait the 3 strands of felt and then secure well with ribbon. Make a bit of a fringe by making lots of small cuts in the felt (2mm deep & approx. 1mm apart) around the side opposite to the notch you made.

To attach the hair, glue the back and sides of the doll’s head & then drape the plaits over each side and smooth across the forehead where you created the fringe. I generally found that the small notch shown in the first picture wasn’t big enough, so you may need to cut away additional felt at the back of the head before smoothing this down.

Wool Hair
Wrap wool around two fingers and tie in the middle. The
thickness and length of the hair will depend on how wide your fingers are
apart, and how many times you wrap the wool around. Glue in place on the head.

This hair style looks better with a hat, or seed pod beret!


Carefully roll down the sleeves of the top/dress to hide the raw edge of the felt and the pipe cleaner. And then add the other hand the same way.


Hands
The easiest way I found to do this was to freeform stitch
multiple ‘hands’ as shown – skinny ‘U’ shapes. Each stitched ‘U’ shape is about
5-7mm wide and 30mm deep.
Then cut them out close to the stitching
Have your pipe cleaner arms inserted into the peg & any top/dress
already on the doll before you add the hands. Roll up the sleeves a bit to
avoid getting glue onto the top/dress. Then pop some glue into the open end of
the hand…
…and then insert the pipe cleaner ‘arm’ all the way into the felt hand.
Hat
This technique worked really well and has held up even more surprisingly well to playing, prying fingers! Glue around the top of the
doll’s head and then a strand of glossy cord wound round and round from the
centre of the head outwards to make the top of the hat. Once you reach
the forehead level, start attaching each consecutive wind of the cord ont
Stabilising Stands
My dad made these for me in his wood working pad. A round
piece of wood about 25mm diameter and 15mm high with a smaller hole about 12mm
diameter and 8mm deep drilled in the middle. A gentle squeeze of the peggy doll
legs to insert the dolly and then dolly can stand!
Happy families!